Vegetable Gardening Basics
At the 2011 Boston Flower & Garden Show, I delivered a talk on vegetable gardening. I did so at the behest of the Massachusetts Horticultural Society which has launched a ‘Garden to Table’ program. As part of that project, I was one of three people who designed a 6000 square foot vegetable garden was built at the Society’s Elm Bank headquarters. The garden has two parts–twenty raised beds planted and grown expressly to supply two local area food pantries. And the Home Chef’s gardens, 21 raised beds and six containers, illustrated the wide varieties of foods that can be grown by homeowners for their own enjoyment. The garden opened in May 2011.
The garden was a huge success last year as we showed everyone the many common and uncommon vegetables that can be grown in your yard. with gardens “Too Pretty to Eat”, we proved that vegetable gardens can be not only healthy, but also beautiiful. While we were at it, we sent oer 2000 pounds of food to area food banks.
My talk at the 2011 Flower Show generated considerable interest and the handout I created for it served as Mass Hort’s primary explanatory piece about its garden exhibit at the show. Copies were all gone by the third day of the show; I reprint it here both for those who missed the exhibit and because those who got a copy tell me it is an excellent, succinct guide for first-time vegetable gardeners.
Getting Started with a Vegetable Garden
Nothing tastes quite as good as a vegetable straight from your own garden. But how do you get started if you have never grown vegetables before?
Choose your location carefully. The first requirement is sun. Vegetables need full sun, a minimum of six hours a day. The more sun, the greater the variety of vegetables that you can grow. Leaf crops such as lettuce, spinach and swiss chard can grow well with six hours of daylight. Root crops such as carrots, beets and potatoes need more, And fruit crops like tomatoes, peppers and corn grow well only when they receive eight or more hours of sun each day.
The second requirement is good drainage. When soil does not drain well, when the soil stays soggy after rain storms, vegetables will not grow there.
The third requirement is water. Make sure your hoses reach the entire garden. Without regular watering, your vegetable garden will not succeed.
Decide the size of your garden. A plot 20 by 30 feet will keep a family of four knee deep in vegetables all summer with plenty left over to share or put up for the winter. A 10 by 10 plot is a good start for a novice, providing space for a variety of vegetables without overwhelming the caretaker.
Good Soil Makes a Good Garden. Before you do anything else, take a soil test. Go to umass.edu/plsoils/soils/test where you’ll find the form and instructions. It’s easy and inexpensive and tells you if you need to add lime to sweeten (or raise the ph) of the soil. It will tell you if you need to add organic matter such as compost, chopped leaves or straw or well aged manure to improve the texture of the soil and its ability to hold water.
To add organic material, dig or till the soil 6 to 8 inches deep, then add two to four inches of organic material. In an established garden, continue to improve soil by simply laying the organic material on the soil and allowing the action of rain, freezing and thawing, worms and other wildlife to mix it into the soil
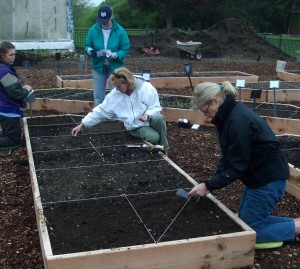
 Choosing your garden design. Traditionally vegetables are grown in rows, like on farms. It’s simple to lay out, easy to weed and harvest. But to get the maximum yield from the garden in your yard, consider raised beds like the one shown at left. Raised beds eliminate annual digging or tilling. They can be filled with improved soil on day one. They dry out and warm up earlier in the spring, but will require more water during the hot, dry months. You can build bed walls of wood, stone, concrete blocks. Or you can simply mound the dirt into beds no more than five feet wide (so you can easily reach in to weed and harvest from the sides.)
Make a List, Check it Twice. When you begin planning your first garden, be realistic. A vegetable garden will need attention several days a week. From the beginning, it must be watered when there is no rain, or not enough. Weeds must be removed to save space, water and nutrients for the vegetables. If you plant too large a garden, you will find the work overwhelming. If you try to put too many plants in your space, nothing will grow well. Read the seed packets to find out how much space you need to allow between plants. Experienced gardeners find ways to cheat, but new gardeners should follow the rules while learning.
Planning Your Garden. If one area in your garden gets a little more shade than the rest, grow the lettuce and other leaf crops there. Even if you’d rather show off your tomatoes, put them where they get the most sun. And the same goes for corn and peppers and squash. Remember you can reuse areas of the garden. Peas are gone by July, so plant a batch of squash in the area, or a second row of carrots or green beans. Place winter squash where the vines can grow over lawn when they get long in August. Plan on fencing your garden. There are many hungry creatures in the suburbs and city—deer, rabbits, woodchucks, raccoons—the list goes on and on. Keep them out with a serious fence or prepare to share your crops.
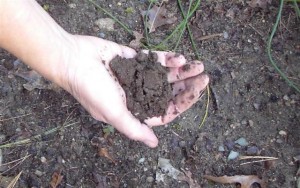
 Planting. When the snow disappears, everyone wants to get started gardening. If the soil is too wet (it clumps when squeezed in your hand) it is too soon. The ground is ready to be worked when it crumbles when squeezed. On the other hand, if you can’t create a lump of any sort, the soil may be too dry and you’ll need to add some water. Add lime if your soil test says it is needed. Now is not the time to work in manure, but compost can be added at anytime.
Check the soil temperature as well as the air temperature. Peas, spinach, some lettuces and cabbages can take cold weather. But most garden seeds will only rot in the ground if planted too soon. Never plant tomatoes, peppers, squash, melons or eggplant until the soil has reached 65°. They need warm soil to germinate. Around here, it is usually not safe to plant these crops until after Memorial Day.
Check the seed packet or a good vegetable gardening chart to see how deep your seeds should be planted. Too deep and they will never germinate. Too shallow and they may be eaten by birds or blow away is not kept damp.
Weeds, Fertilizer and Mulch. Weeds come with any type of gardening, but they are most frustrating when it is difficult to tell which is the weed and which is the bean or lettuce you planted. Many seed packets have photos of that variety’s seedling so you can recognize the good guy. Sometimes you just have to wait until they get bigger to tell one from the other. But you can keep the number of weeds down by always removing weeds from the garden before they go to seed. “One year’s weeds, seven years seeds.”
When you add fertilizer to your garden, do it by hand for each area. Not long ago, the recommendation was to scatter the seed evening over the entire area. Don’t! Keep it in only those areas where your crop is growing. Remember that many crops need little additional fertilizer is you have added compost in the spring, or an animal manure the previous fall.
Finally use mulches. We are all familiar with red or black plastic mulches put down to keep the soil warmer for tomatoes or melons. But mulch every vegetable and the rows and you will prevent many weeds from ever appearing. One organic, effective and inexpensive way is to lay newspaper three sheets deep in the pathways. You can cover it with grass clippings, straw, wood chips or any other material. After your seedlings are big enough, you can tuck straw or dried grass clippings around—but never touching—plants. These methods keep light away from the weed seeds so they can germinate. And they rot away naturally enriching the soil for the next year. Note: never use grass clippings from a lawn treated with herbicides or pesticides! Mulch also reduces your watering chores by preventing water from evaporating from bare soil and by keeping the root zone cooler during the hottest days of summer.
Watering. Dry plants under stress and plants under stress do not thrive. A dry tomato plant cannot set fruit. A dry lettuce wilts, a dry beet turns woody. If you haven’t had a full inch of rain in the last week, your plants are suffering. Measure it with a rain gauge or tuna can. If you have any doubt, dig down 10 inches and feel the soil. Is it moist? When your vegetables are small, you must keep the soil wet closer to the surface, but as the plant grows above ground, keep the roots growing deeper by watering less often and more deeply. Shallow watering produces shallow roots that are easily dried out by hot, sunny or windy days. Sprinkler are easy, but very inefficient, losing half the water they put out to evaporation. They spread disease as water droplets bounce from one leaf to another. Drip irrigation goes exactly where needed with no water loss. Hand watering gives the gardener the chance to check plants, but it is easy to under water. Always dig down at least six inches to be certain the soil is wet that deep. It takes longer to water deeply, but you’ll do it less often.
